Create a robust login system in ProcFu
In this blog post, we will create a robust login system using ProcFu connected with Podio.
Features we will build
- User registration to Podio
- Verify unique email id
- Login using Podio
- User email verification
- Resend verification code
- Forget Password
Create a Users app in Podio.
Create your app in ProcFu (My App Name - Access)
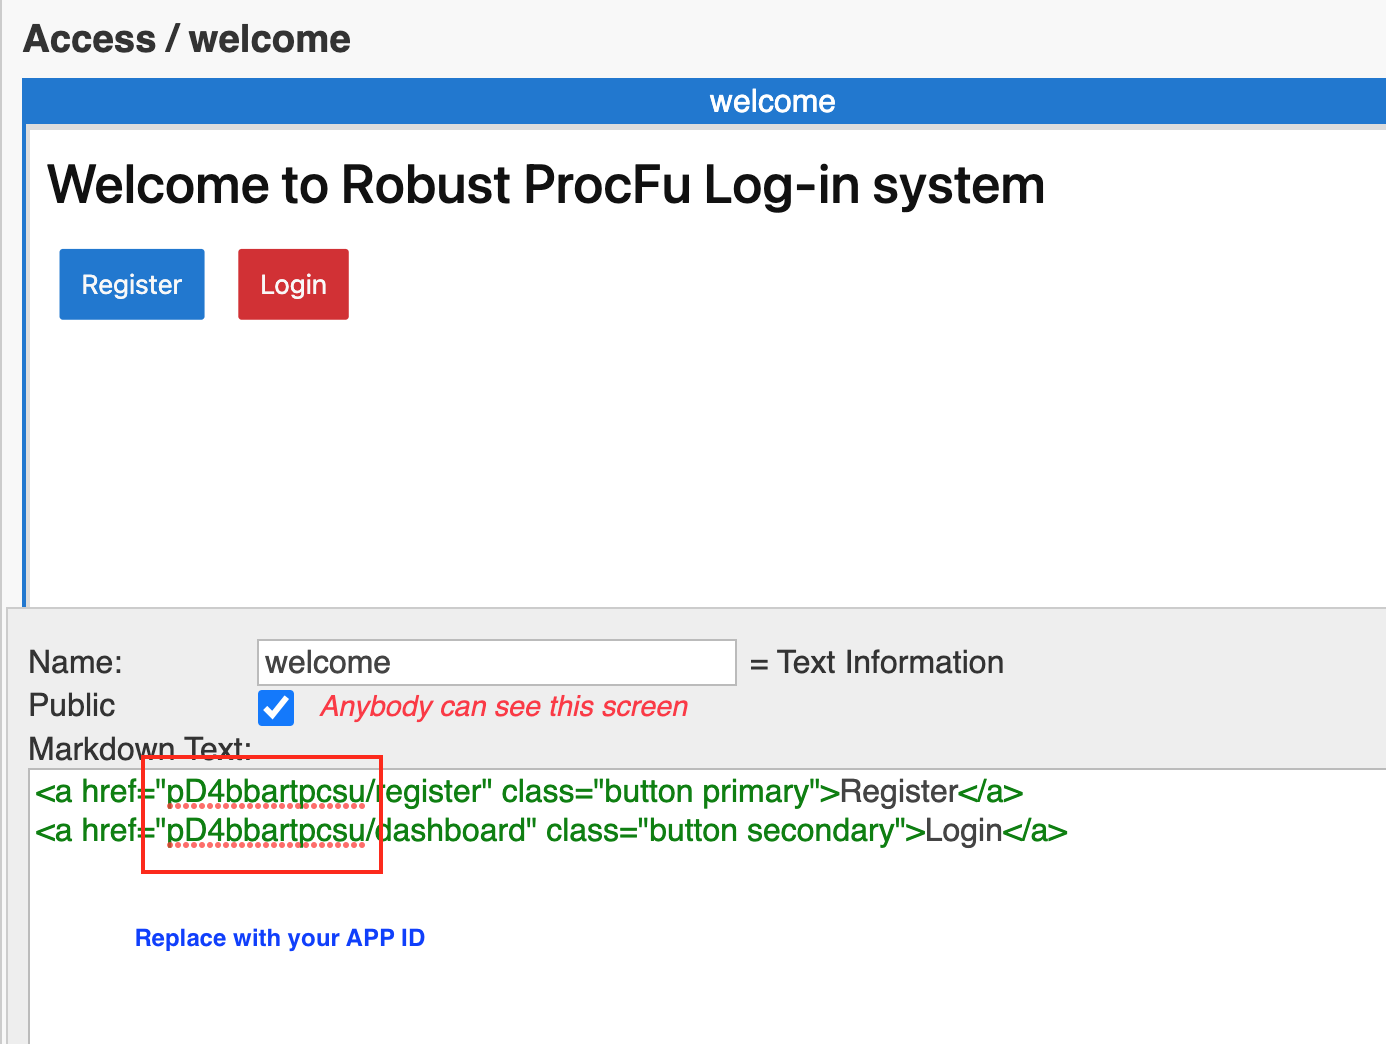
Welcome Screen
- This is the first screen users will land on. Consider it as your homepage.
- The screen type is Text Information.
- We will create two buttons - Login and Register.
- See the below screenshot for the content of the screen.
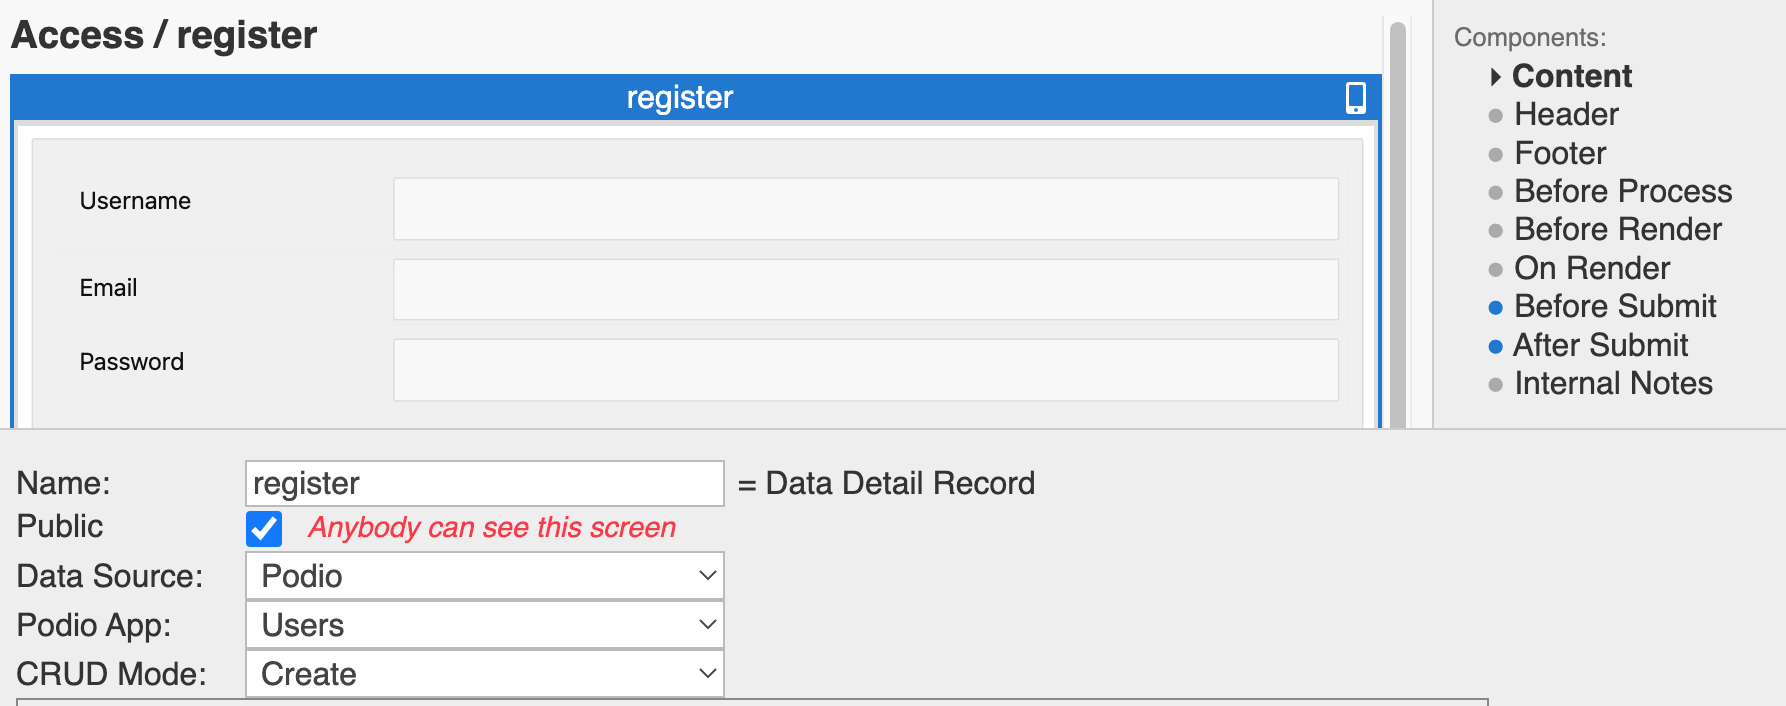
Register Screen
- This is where users register.
- The screen type is Data Detail Record.
- The Public checkbox has to be checked as we want users to be able to access this screen without login.
- Set the On Submit option as ‘start’.
Register Screen - Add Heading
Add the following code to the Header option to add a heading.

Register Screen - Change Save Button text
By default, a create form save button has the word Save in it. Let us modify it to Register New User.
To do that, add the following code to the On Render option.

Register Screen - How to make sure the user’s email is unique
- Once the user fills the form and clicks the register button, we will collect the form data
- Pick Email ID submitted
- Query Podio and see if this email already exists. To Query Podio, we will use a pre-existing ProcFu function called
podio_app_search.
- ProcFu has many such functions that make our life easier. Click here to see them all.
- If the email exists, we will return an error message.
- If not, we proceed to save the user
Go to the Before Submit option of the screen and write the following code.
//Query Podio - Will return all the entries with matching email.

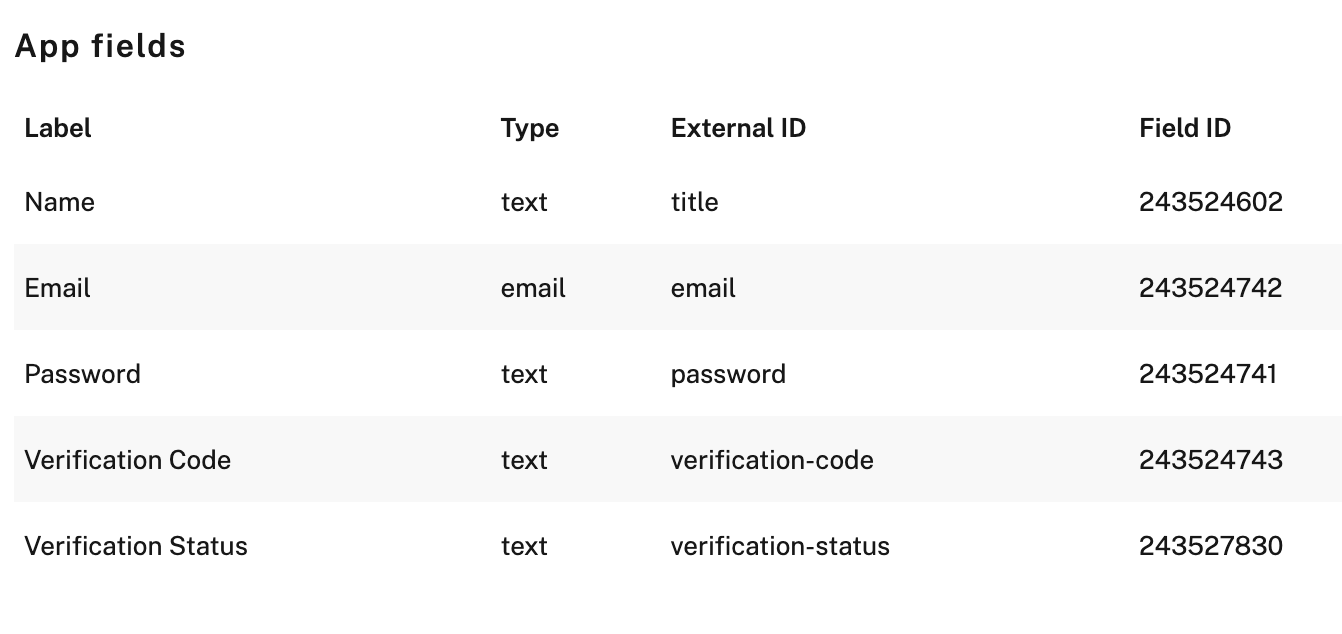
result = podio_app_search(27861771,243524742,form_values["email"][0],'C',1)

//27861771 - is the Podio App ID. You can find it from the developer options in the app settings

//243524742 - is the Email Field ID. You can find it from the developer options in the app settings (Refer to screenshot no 1 above)

//Error Message
message = "Email ID Exists. You already have an account. Please cancel this screen and log in. In case you have forgotten your password, use the forgot password feature to generate a new password."

//Check the count of the result. If it is more than 0, it means there is already a user with this email. In which case we will return the error message.

if (count(result) > 0){
	return message
}
Register Screen - Generate a verification code
In the Before Submit option, we will add one more line of code which will generate a random 5-digit number and save it to the ‘verification-code’ field of the form. This code will be emailed to the user for verification and saved to Podio in the ‘verification-code’ field.
form_values["verification-code"] = strval(rand(10000,99999));

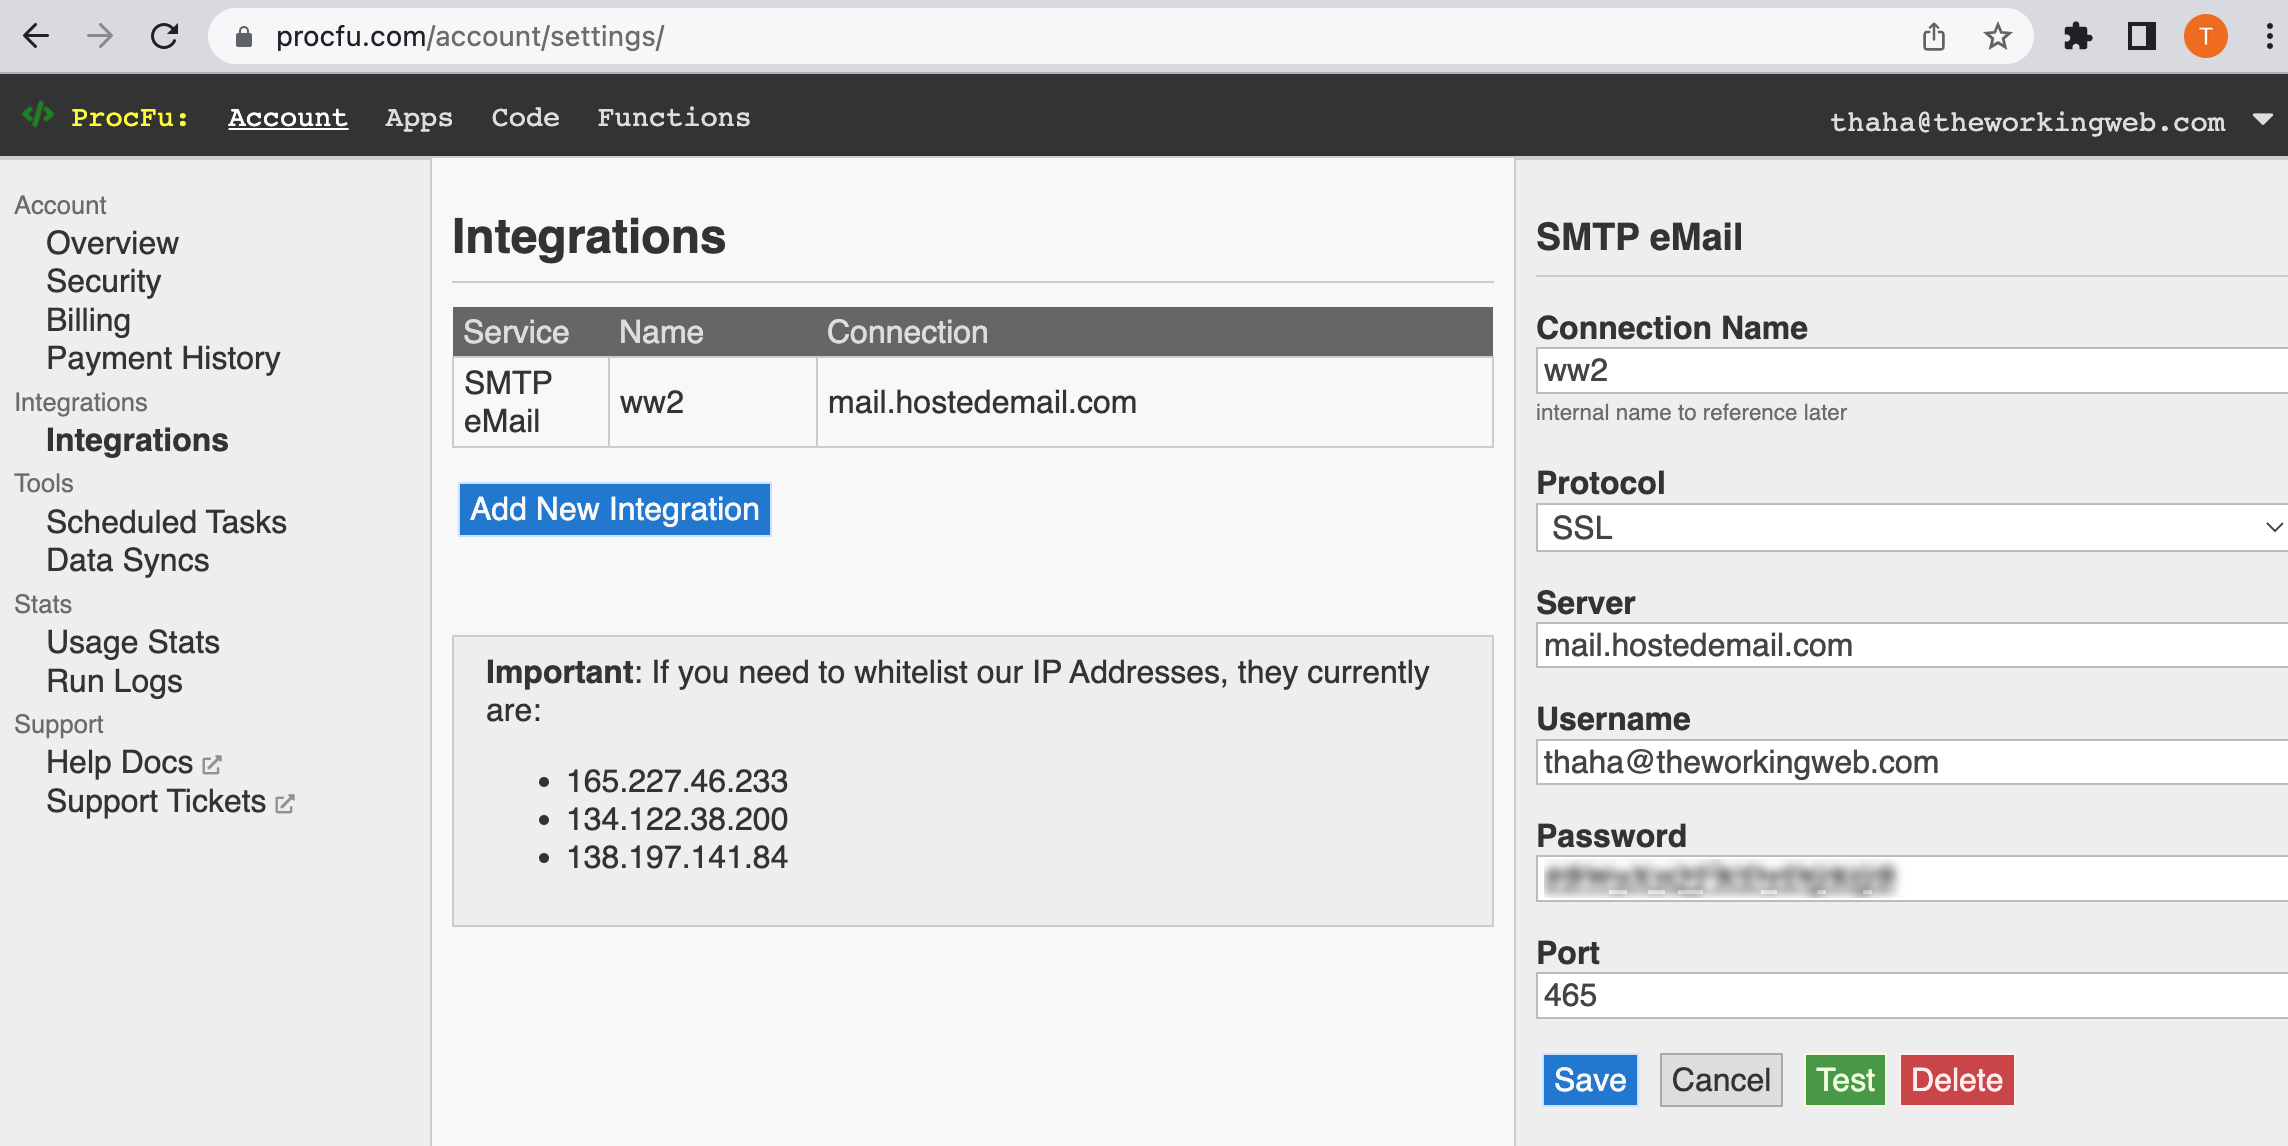
Integration - Setup an email service to send emails
To send an email from ProcFu, you must integrate your email server with ProcFu.
You can do it in the integrations options of ProcFu settings. Click here.
I have set up an SMTP mail server and called it ww2.
Register Screen - Send the verification code to the user by email
Go to the After Submit option of the register screen and write the following code to send an email.

Dashboard Screen
- This is the screen users will land on after successful login.
- The screen type is Text Information.
- Add a simple text and a logout button.
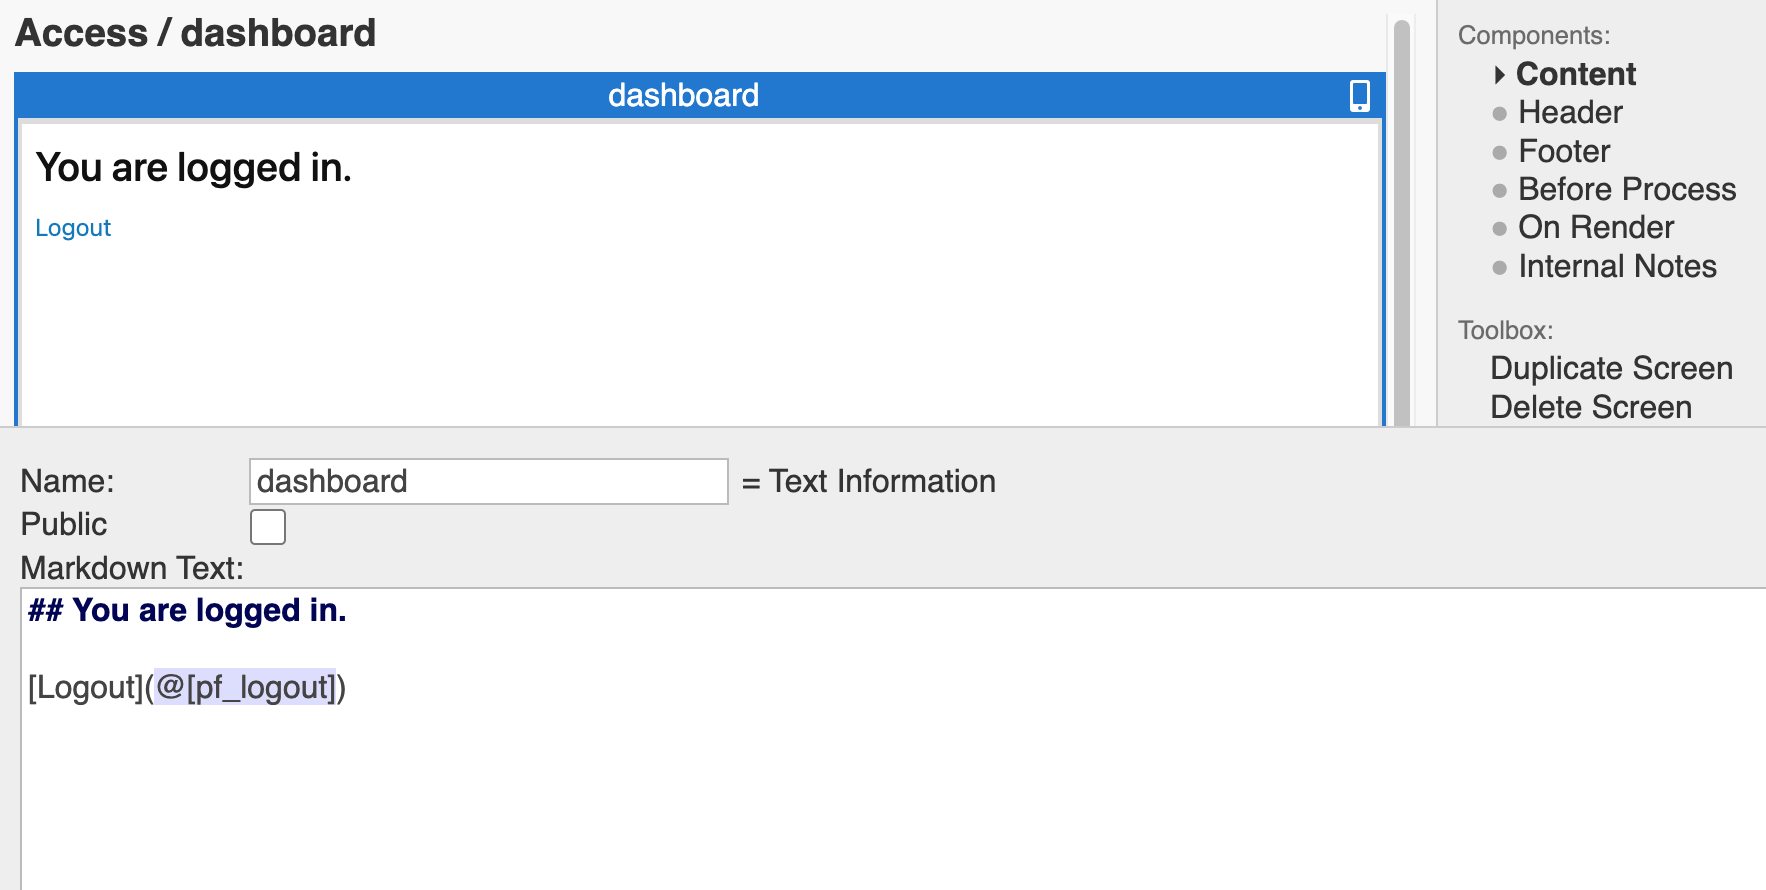
The Public checkbox has to be unchecked. This means only logged-in users can see the screen.
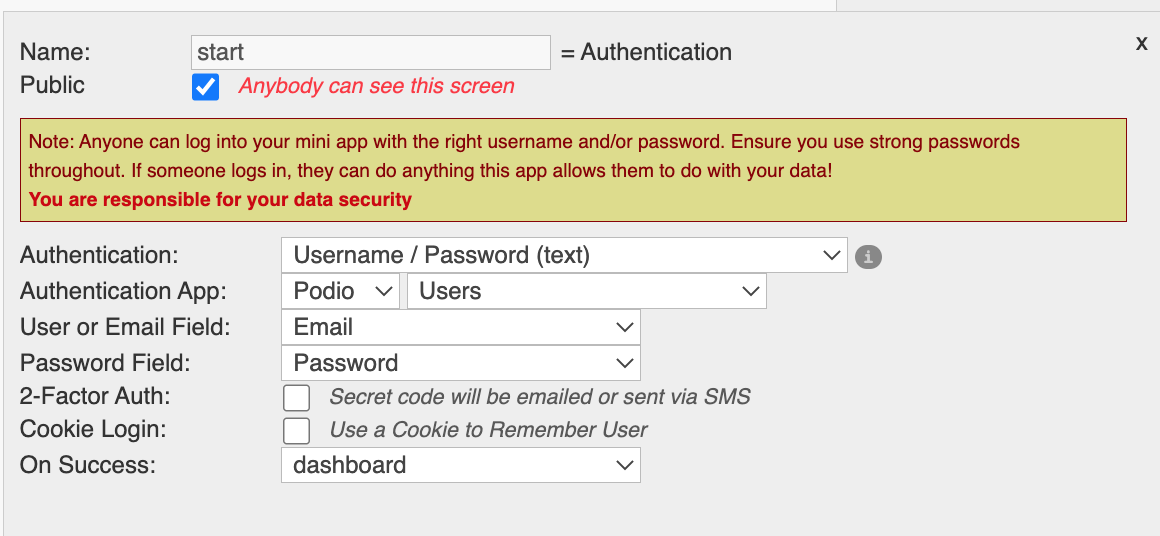
Start Screen
Set up the start screen as follows.
Start Screen: Check if the user is verified
- Once the user enters the username and password successfully, ProcFu stores the user information in
auth_item_valuesvariable.
- Add the following code to the On Auth Success option of the start screen.
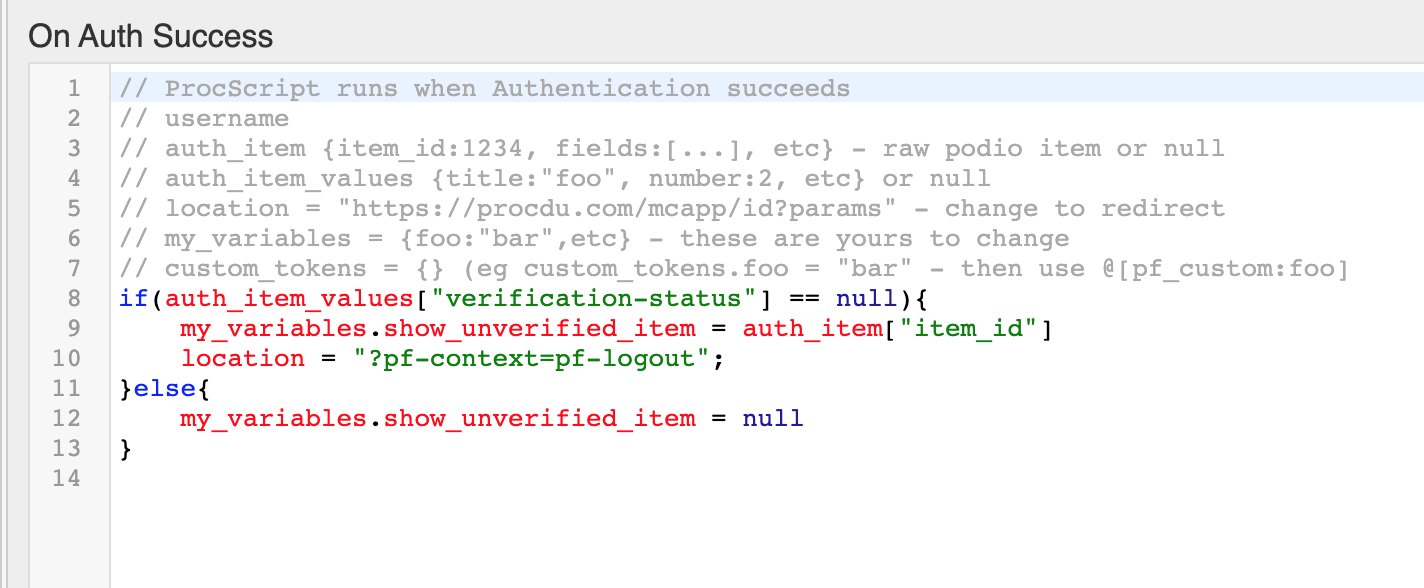
- Line 8: Checks the value of the ‘verification-status’ field. Null means the user is not verified.
- Line 9: If the user is not verified, we save the user id in a variable called
show_unverified_iteminsidemy_variables
- Line 10: Logs out the user.
- Line 11,12,13: If the user is verified, we clear the user id from the
show_unverified_iteminsidemy_variables
my_variables and not custom_tokens to save values here?
This is because, when a session is logged out custom_tokens get erased. But the session would still remember my_variables
Welcome Screen: Redirect user to verify screen
If the user is unverified, we have logged them out. We want to send them to verify the screen.
Here’s how it will happen:
Login > Success > Check Verified > if Unverified > Force Logout > Public fallback screen > Verify screen
Once a user is logged out they will be sent to the public fallback screen. By default, the public fallback screen is the start screen. In the next step, we will change it to the welcome screen.
In the welcome screen, we will put a piece of code to check if they are coming after a force logout due to non-verification. If yes, we will send them to verify page.
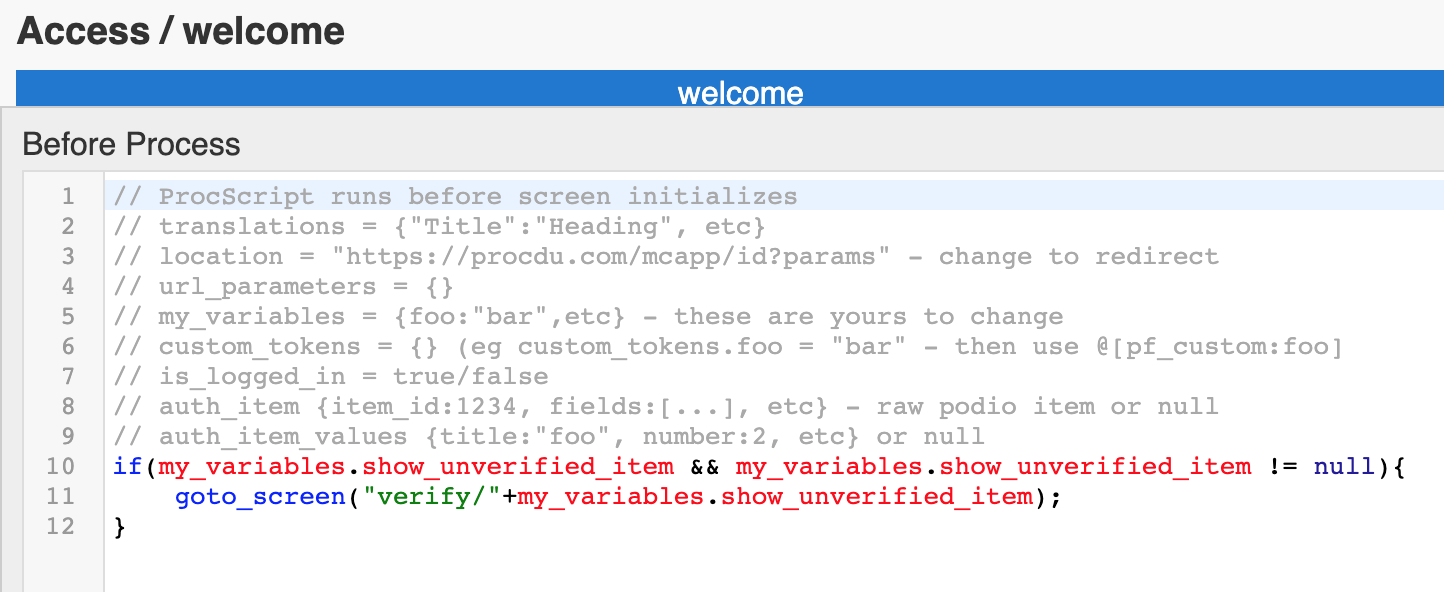
There are two conditions in the if statement.
The first one checks if there is a show_unverified_item variable. People coming to the homepage the first time won’t have it.
The second condition checks if the show unverified has a value that is not null. Then it will redirect the user to verify the screen with the item id.
ProcFu App: Change the default fallback screen
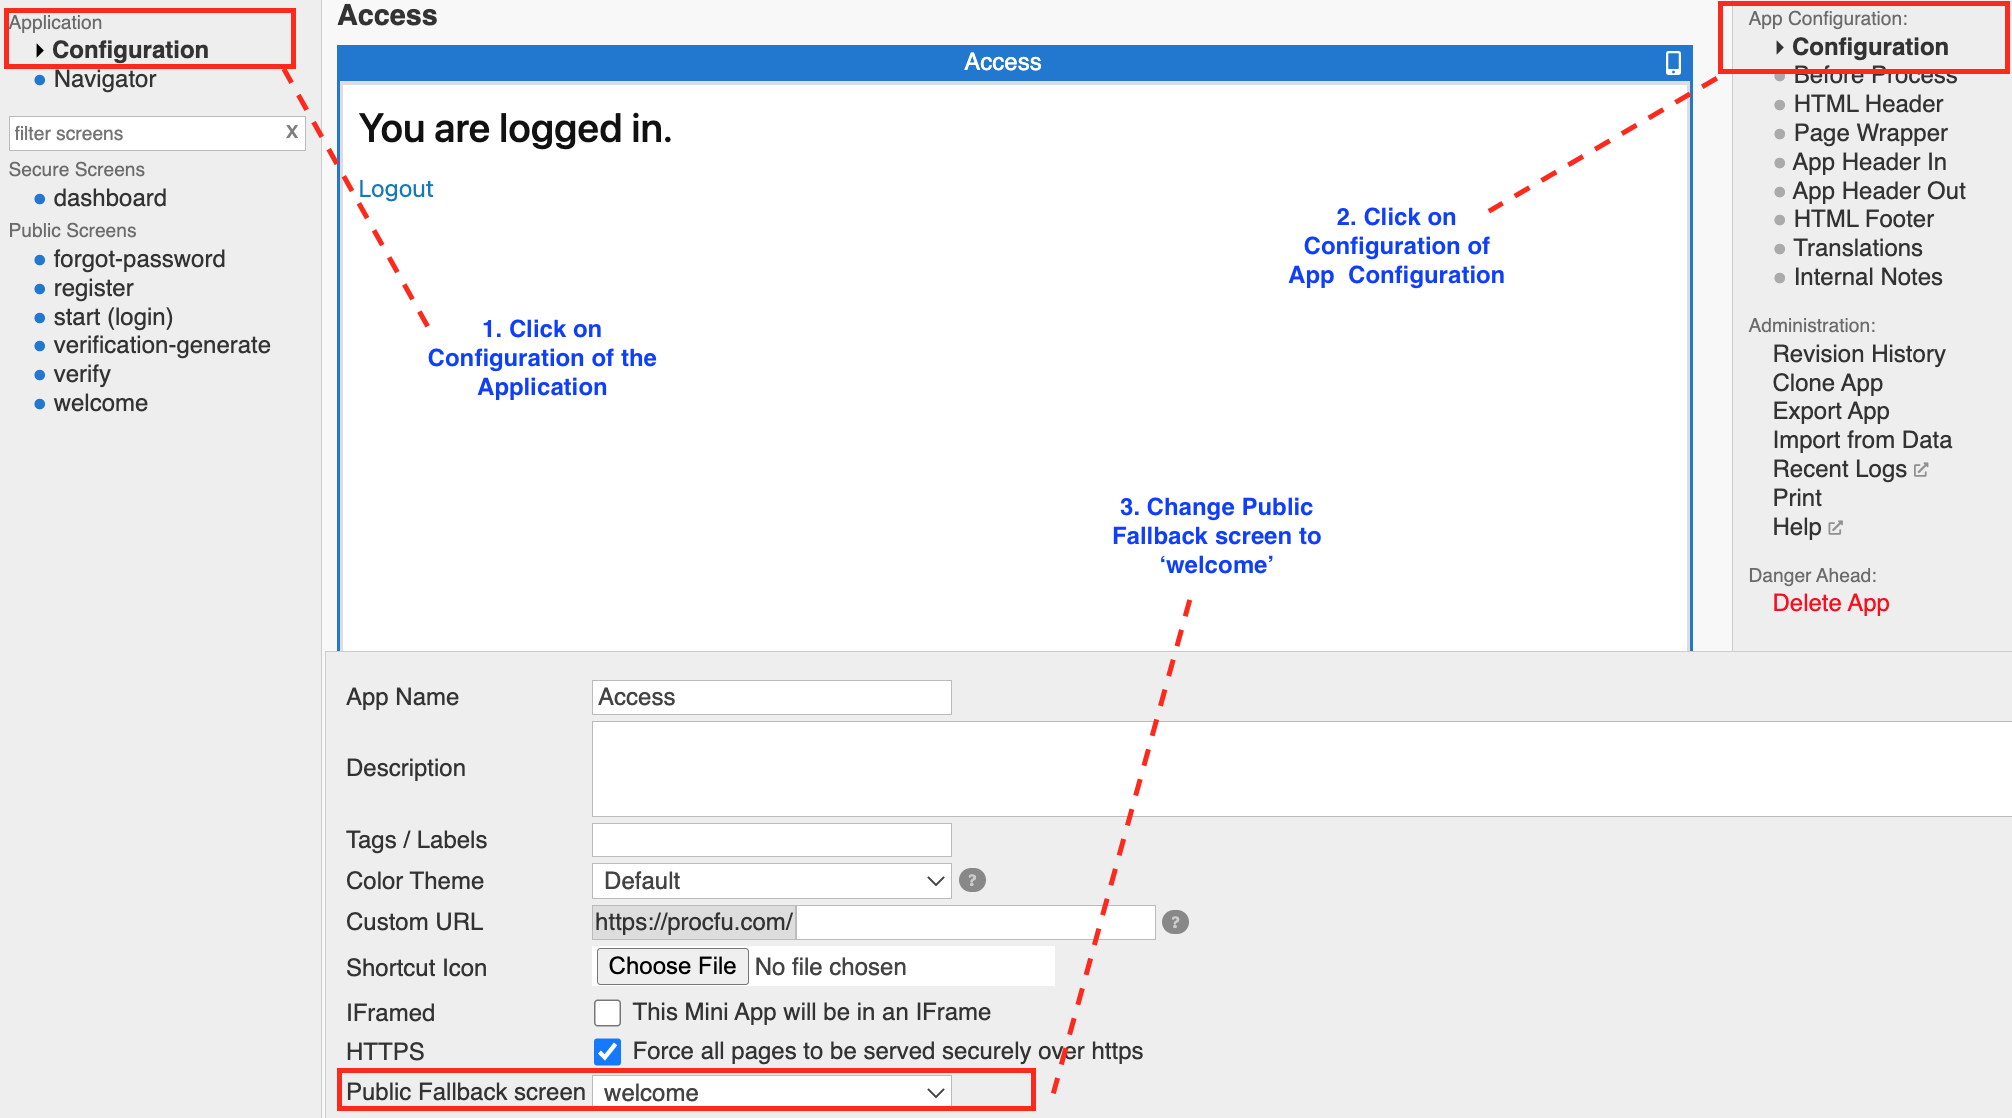
Once the user is logged out, the app sends the user to the fallback screen. By default, the start screen is the fallback screen. Let us change it to the welcome screen.
This can be done in the configuration of the application. Follow the screenshot below to do it.
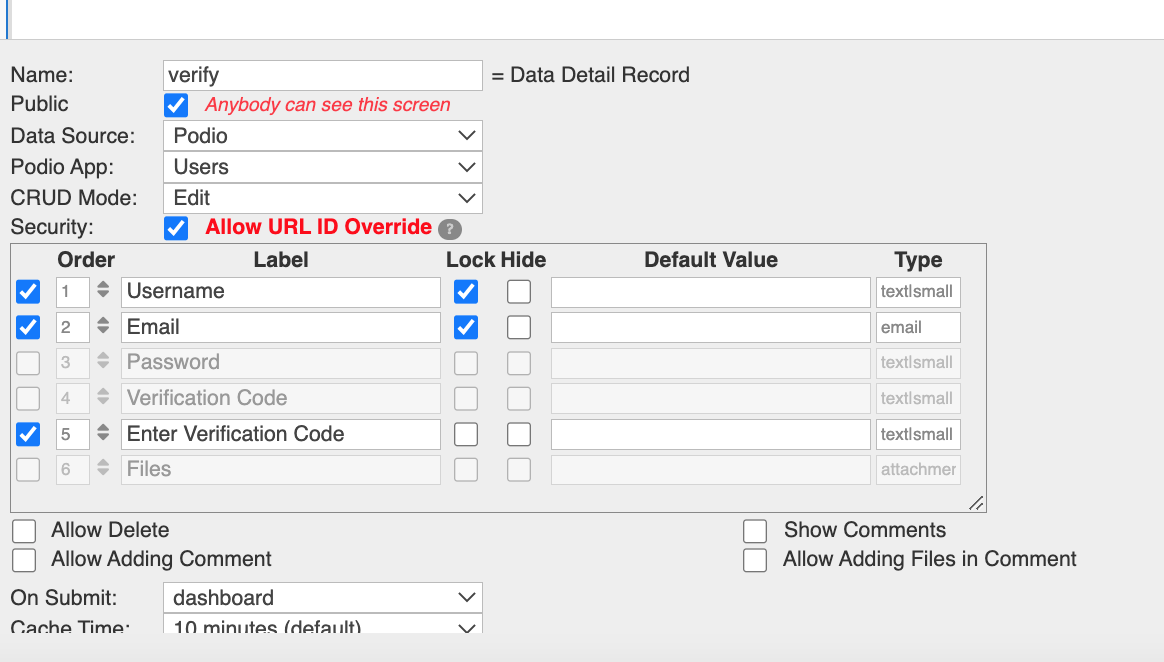
Verify Screen
Users will be presented with their name and email and a text field where they will enter the code they have received by email.
- This is where users verify themselves by entering the code
- The screen type is Data Detail Record.
Please note that Security: Allow URL ID Override is checked.
Verify Screen: Redirect users who try to access this screen directly
This is an extra layer of security we are going to add.
We don’t want users to land on this page without an item id. This will throw an error.
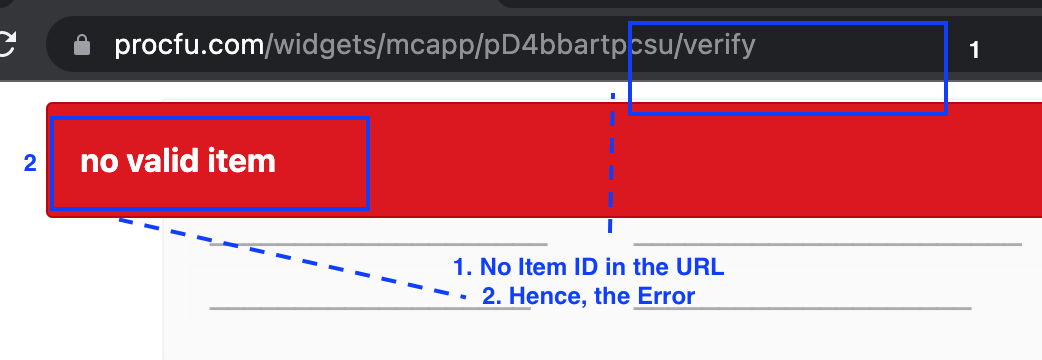
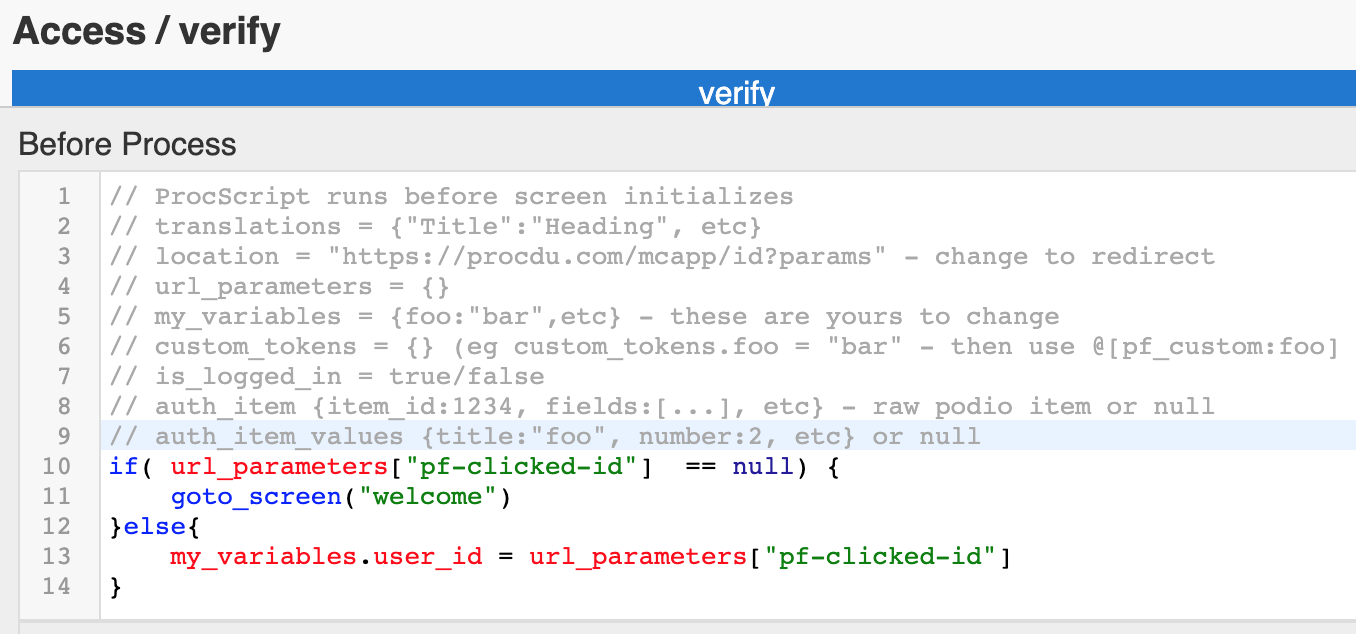
Please add the following code to the Before Process option to avoid such an error.
Line: 10,11,12 redirects users to the welcome page if there is no code preventing error display.
Line: 12,13,14 created a new variable called user_id and saves the item_id for future use.
Verify Screen - Change Save Button text
By default, a create form save button has the word Save in it. Let us modify it to Verify.
To do that, add the following code to the On Render option.
$("form[data-type=item] button.primary").html('Verify');
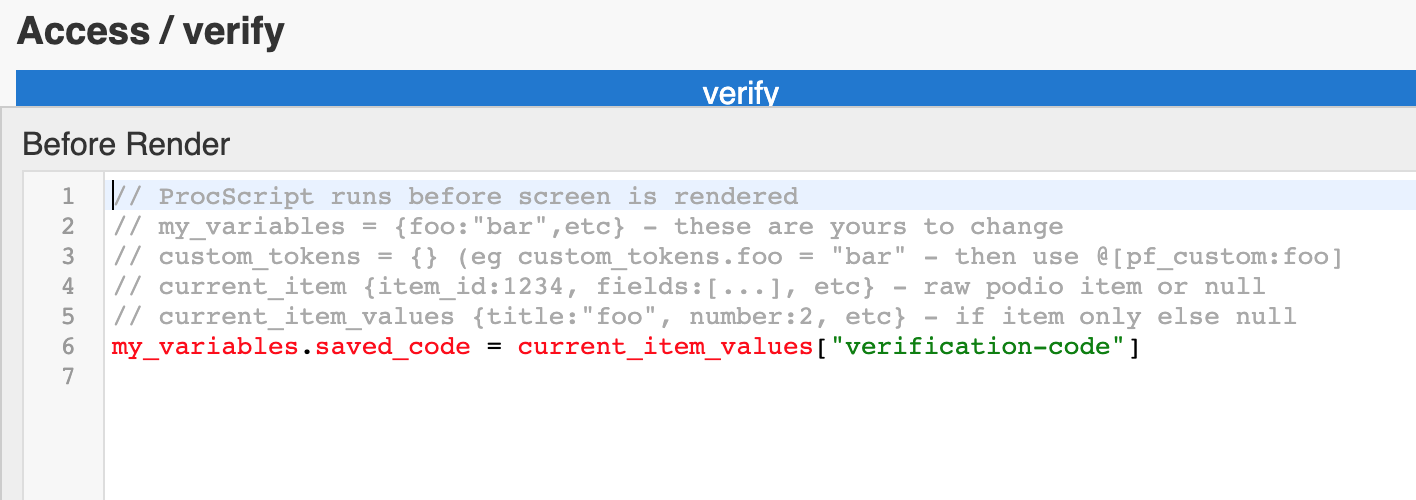
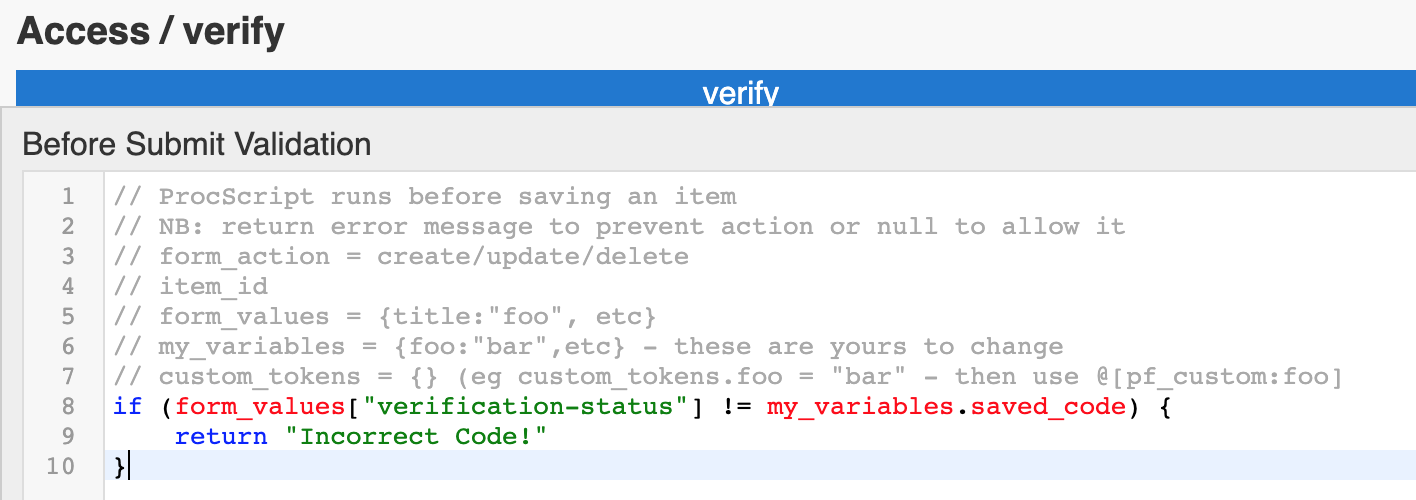
Verify Screen - Verify the code
- Once a user lands on the verify page with an item id, we have the access to the whole item. It is saved in
current_item_valuesin the Before Render option.
- If the code does not match it will return an error.
- If it matches, the screen will proceed to save the code into the
verification-statusfield of the item.
Verify Screen - What if the user has lost the code and wants to generate a new code?
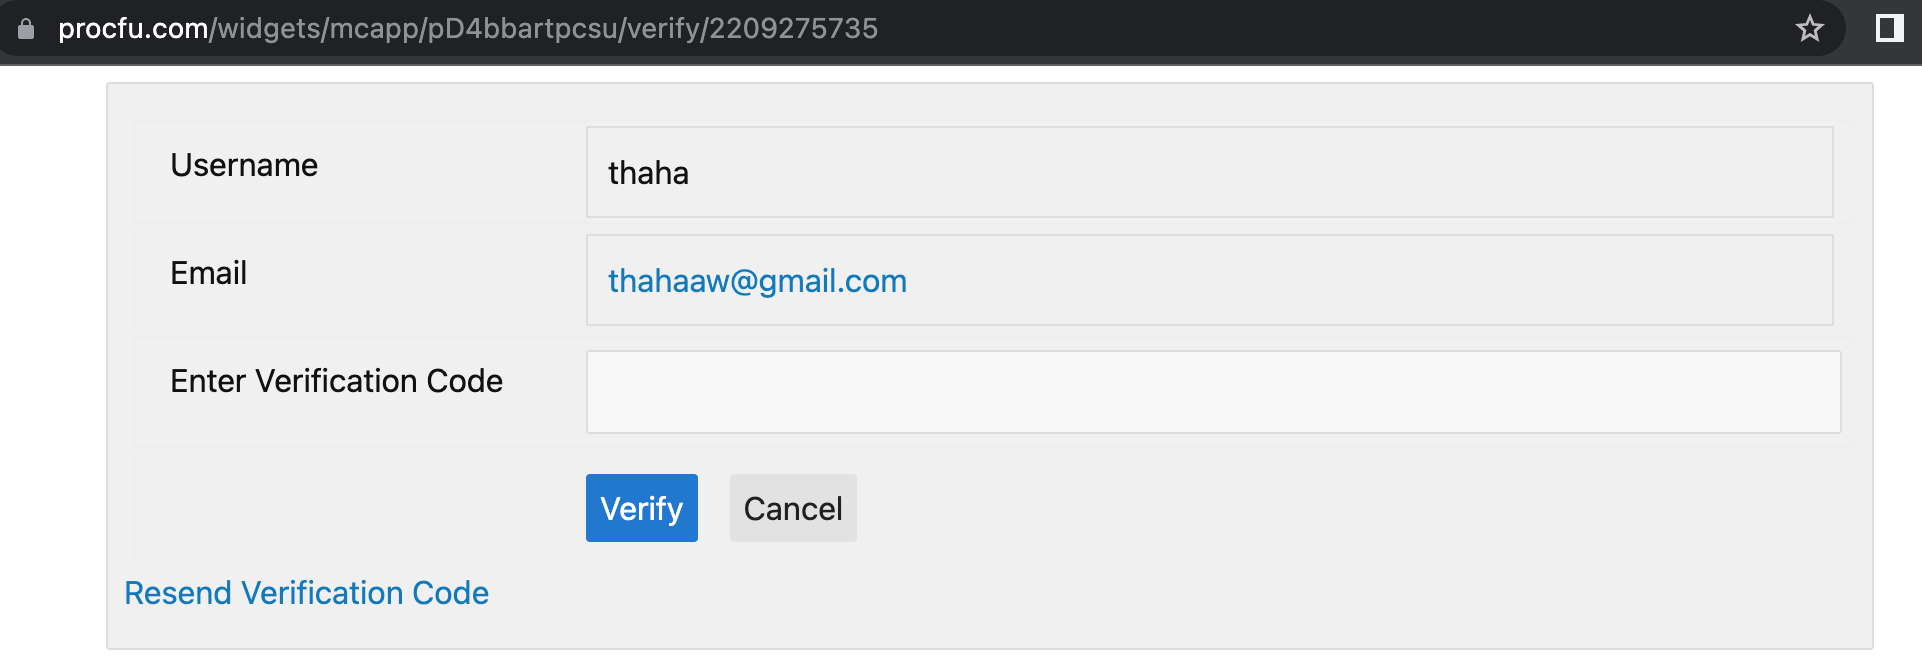
- We will add a link in the verify screen which will take the user to a new screen where they can generate a new code.
- Place the code after the existing line of code to change the button name.

- The code will create a link that will be shown as follows:
Verification Generate Screen
Users will be presented with their email and a button to generate a new code.
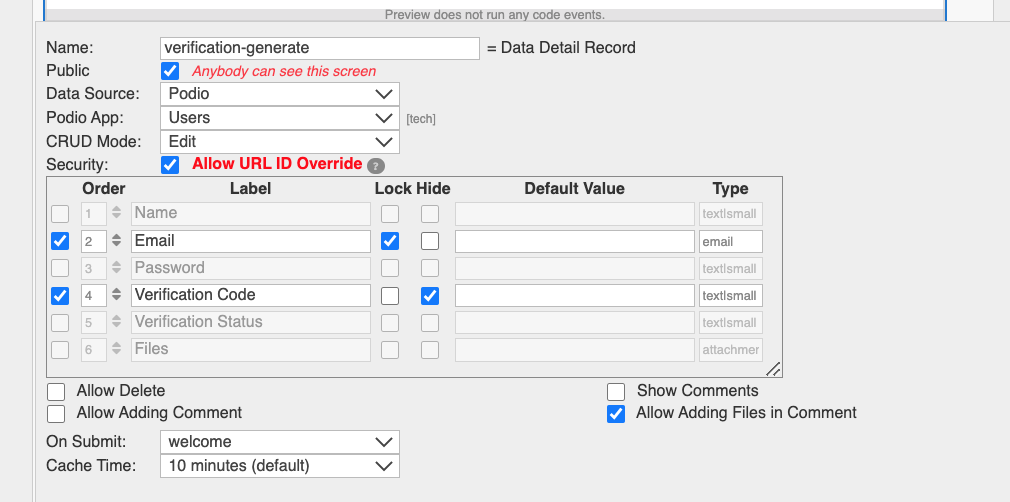
- Create a new screen and name it
verification-generate
- The screen type is Data Detail Record.
- Add the following code in the On Render option to change the button text to ‘Generate Verification Code’
$("form[data-type=item] button.primary").html("Generate New Verification Code");
- Add the following code in the Before Render option so we can collect the email and the item id
my_variables.email = current_item_values["email"]
 my_variables.user_id = current_item["item_id"]
- Add the following code in the Before Submit option to send an email with a new verification code. Save it to the item in Podio and return a message
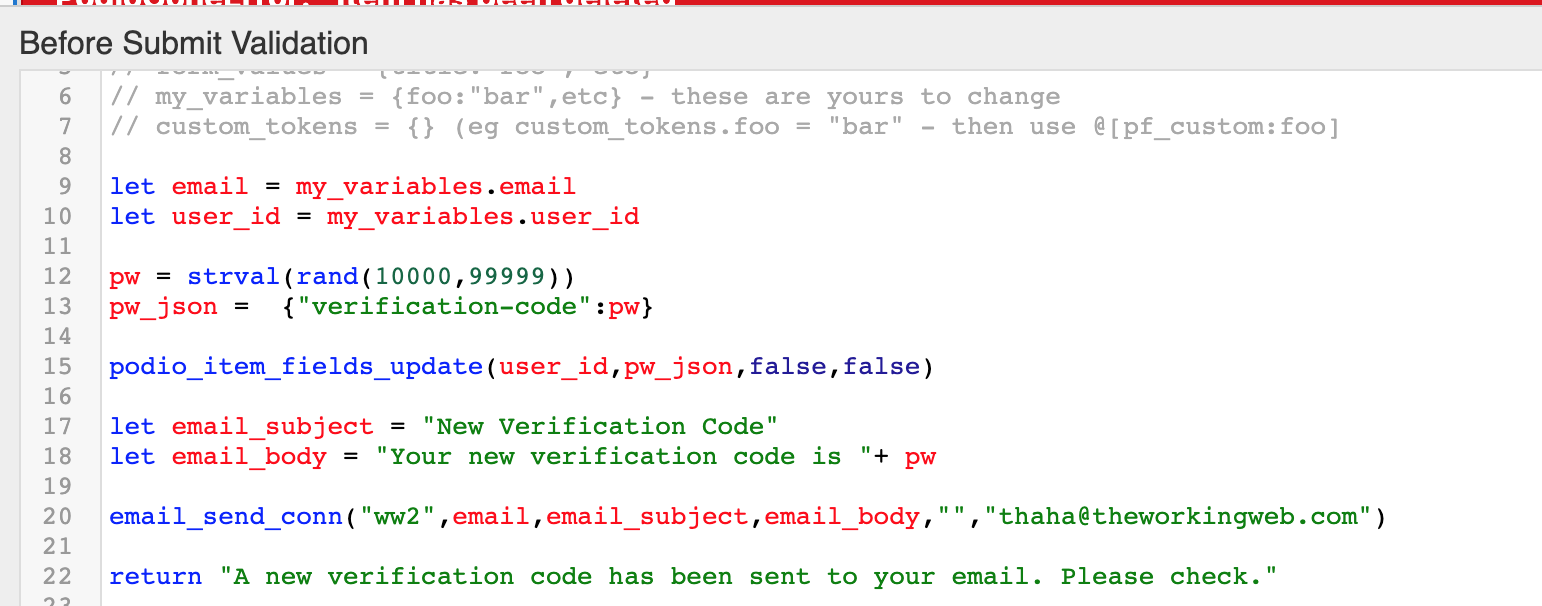
Line 12: Generates a new 5-digit code
Line 13: Converts into JSON so we can save into Podio
Line: 15: Uses a pre-existing ProcFu function called
podio_item_fields_updateto update the new code into PodioLine 20: Sends an email with the new code
Line 22: Returns message
Forgot Password
If the user forgets the password, we will create functionality to generate a new password and send it to the user.
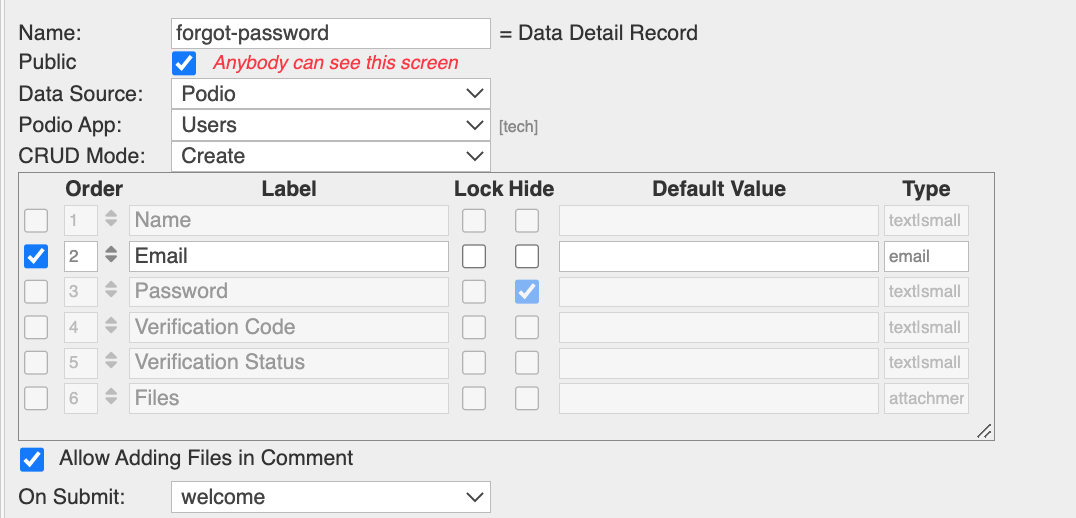
- Create a new screen and name it
forgot-password
- The screen type is Data Detail Record.
- Add the following code in the On Render option to change the button text to ‘Generate New Password
$("form[data-type=item] button.primary").html("Generate New Password");
- Once the user types in their email id and submits the form we will generate a new password and send it. Write the following code on the Before Submit screen to do that.
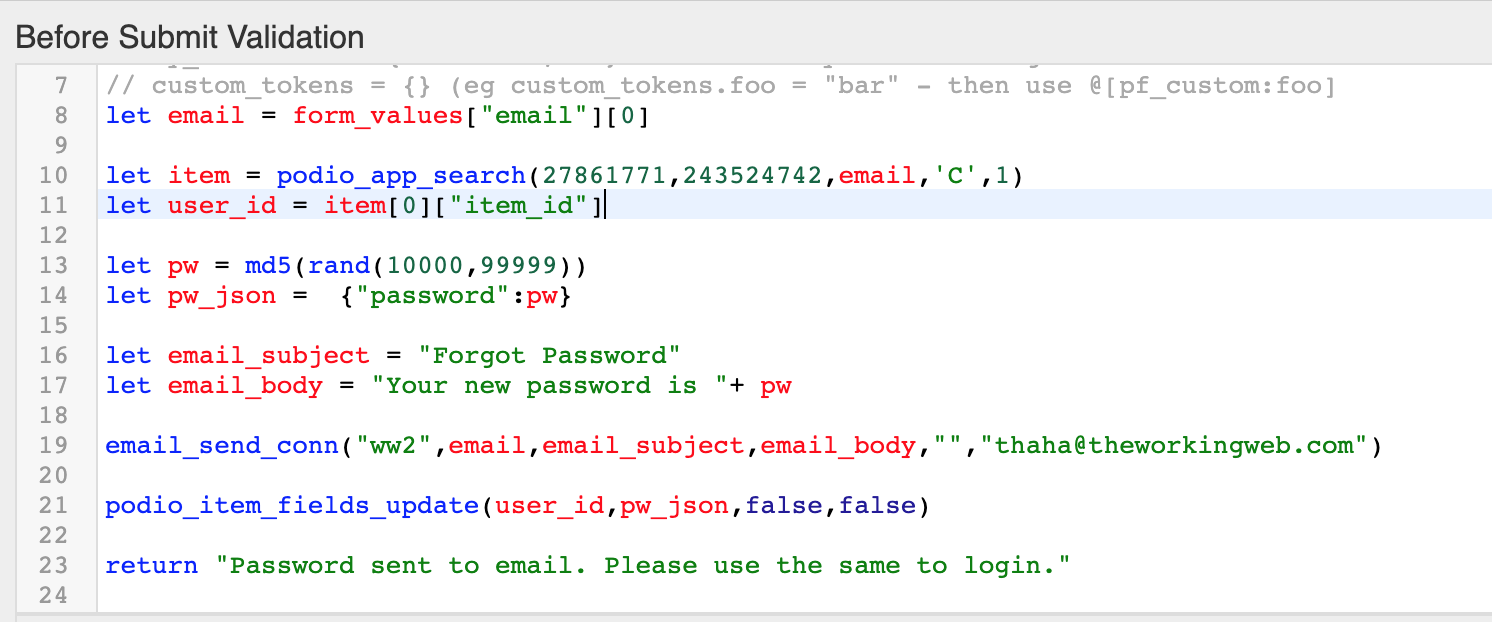
Line 10: Find the user using the submitted email id. We use a pre-existing ProcFu function called
podio_app_searchto search the email and get the user.Line 11: Get the user id
Line 13: Generate a random 5-digit code and encrypts it into md5 which makes it a pretty safe password
Line 19: Send the email with the new password
Line 20: Update Podio with a new password using another pre-existing function called
podio_item_fields_updateLine 23: Return message.
Conclusion
This is an introductory tutorial to show the capabilities of ProcFu and ProcFu functions. You can explore various aspects of this and build your own login system.
Additional Tip:
If you want to, Toggle Password Visibility in the Start (Login) screen here’s an example from our user forum. https://podio.com/globimail-6cjnuoairo/procfu-users/apps/user-forum/items/675
- Create a new screen and name it

